
Snapchat’s New Features: Tactical Genius?
September 17, 2015[VIDEO TUTORIAL] Find and convert customers on Twitter using IFTTT
October 3, 2015
The following blog will provide a step by step, quick start guide on how to use Social Media automation. Social Media automation allows any business to have the time to use Social Media Marketing to help achieve its objectives. The number 1 tool for Social Media Automation is Buffer.
Buffer is your magic box which you can use any time to fill with great Tweets, Facebook stories, LinkedIn updates & more. Just drop them in and you don’t have to ever worry about when they will be posted, it’s all taken care of by Buffer for you.
The 3 simple steps below will help you to set up and use Buffer.
Hold your fire! Before setting up buffer, I'd like to share an awesome (completely free!) social media email course with you. The course includes step by step video tutorials created by buffer which have helped me develop my social media strategy so, so much. Sharing is caring right?
Sign up to the free 10 week email course below to receive 1 high quality Social Media Strategy video tutorial email created by buffer every week, for 10 weeks.
As always, the emails won't include any salesy rubbish. Just high quality social media strategy video tutorials.
[mc4wp_form id="3819"]

As always, this blog is all about helping you learn and apply effective strategies to help grow your business! In this blog you will learn;
- How to setup your Buffer account.
- How to create a posting schedule in buffer.
- How to add content to buffer.
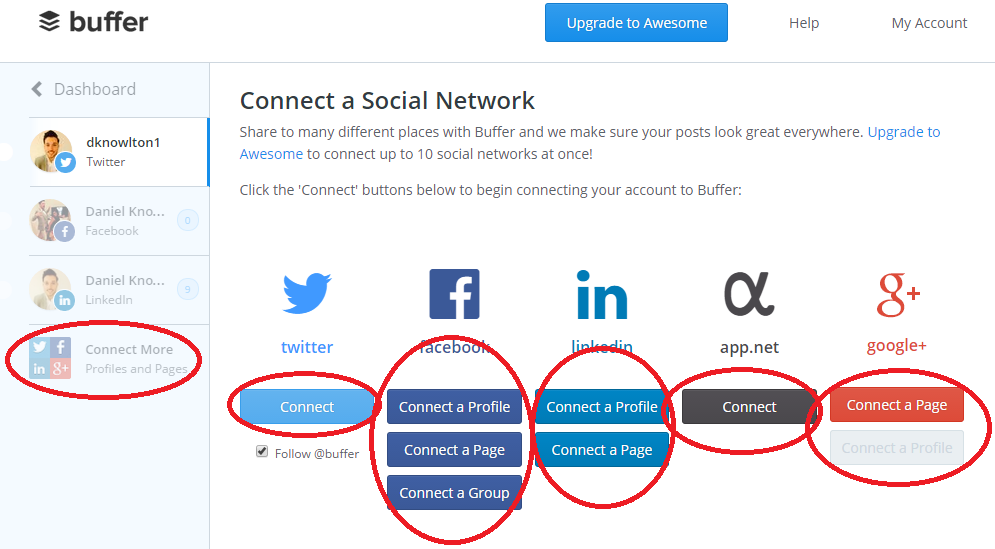
Sign up to Buffer by entering one of your social media login details and then connect your social media accounts (you can connect 4 separate accounts with the free version).

Next, you need to create a posting schedule for each of your social media profiles. This tells buffer exact days and times you would like to post content in your schedule.
Start with your first account by clicking on the relevant icon on the left (in my case I started with Twitter). Click on the schedule tab and then add however many scheduled posts you would like to be set each day.
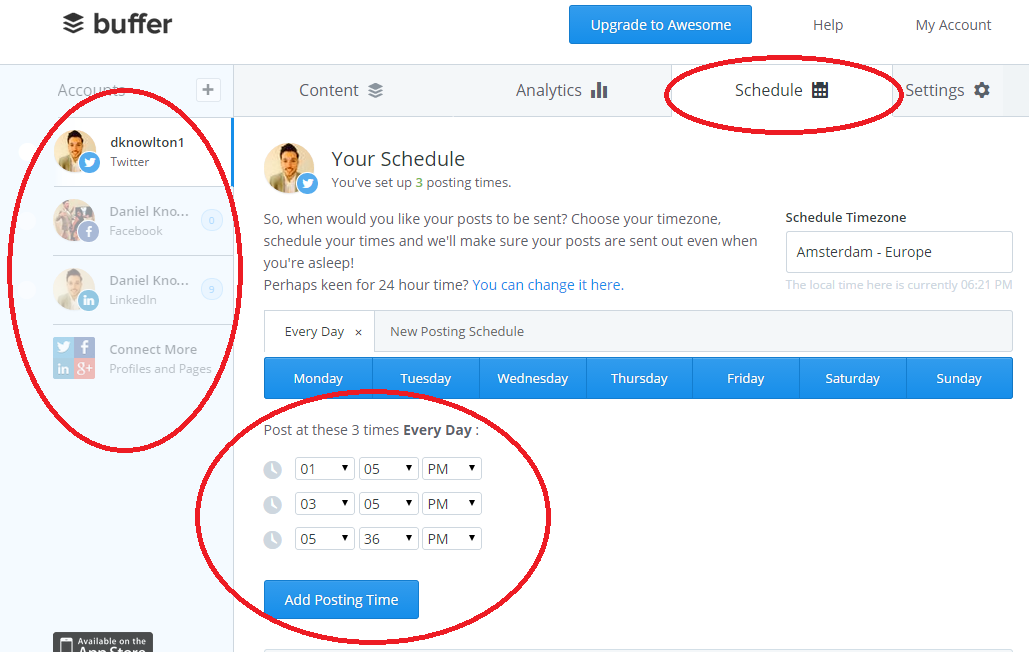
Note: On the free plan you can only queue 10 posts for each account at once. Bare this in mind as setting too many posting times will mean a constant need to keep filling up your buffer with content.
For example, if you set the maximum of 10 scheduled posts a day for one social media account, this would mean that at the end of every day you would need to fill up buffer with 10 new sets of content. I stick to a schedule of 3 scheduled tweets per day with Twitter as this gives me just over 3 days’ worth of automated content at a time.
Repeat this process for the rest of your accounts by clicking their icons on the left hand side of the screen.
Note: Social media sites such as LinkedIn only require an average of 5 posts per week. This means your maximum of 10 scheduled posts at a time will last a whole 2 weeks.

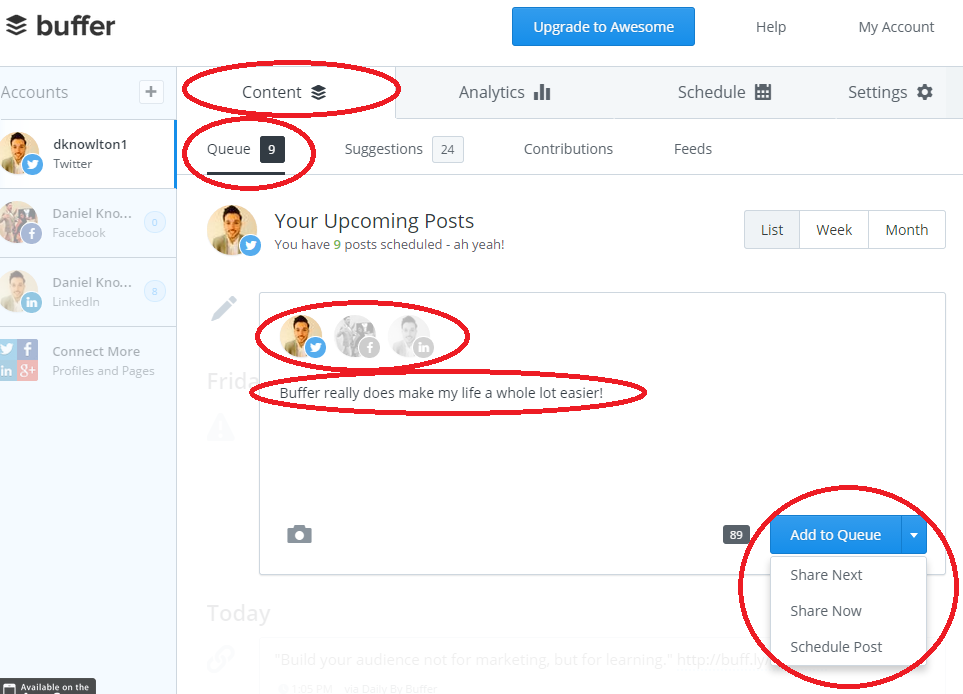
Now you need to add content to buffer. Click on the ‘content’ tab, then ‘queue’ and then simply enter your post. You can add an image with the camera icon or link to any kind of content. Just above the textbox there will be icons for the social media accounts you synced with buffer. Click on the accounts you would like the post to go to (in the example below I have only decided to share the post with Twitter.
Once you have added your content you have 3 options in regards to when it will be posted;
1. Add to Queue: this will add the post to the next available slot in your schedule that you set up in step 2.
2. Share now: This will share the content immediately.
3. Schedule post: Here you can choose any date and time to schedule the post.
It is as simple as that. Your posts will be scheduled for your customised times. All you need to do now is keep your buffer topped up.

Buffer is a huge part of my social media strategy and it has helped me tremendously.
I have learnt lots of great tips from the content and tutorials Buffer have created and would love you to do the same!
Sign up to the free 10 week email course below which includes social media strategy video tutorials which have helped me achieve some great results.
[mc4wp_form id="3819"]
Social Media Automation: A quick start guide for beginners - KPS Digital Marketing http://t.co/L8SaYYIAIN via @Dknowlton1 #SocialMedia #Kent
— Daniel Knowlton (@dknowlton1) September 29, 2015Daniel Knowlton
Dan is the award winning Co-founder of KPS Digital Marketing who was named #12 Most Influential Digital Marketer on Twitter in the world in 2016 by Onalytica. Dan is a contributor for a variety of key marketing publications including Social Media Examiner, Content Marketing Institute and Jeff Bullas’ Blog. He is also a keen speaker and has spoken at events internationally for a variety of organisations including NatWest and The Royal institute of Chartered Surveyors. Dan has a passion for helping others learn how to get to grips with Digital Marketing and is obsessed with providing value for his community.

